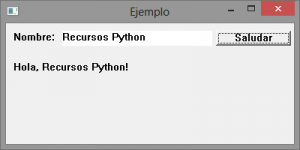
El siguiente código de ejemplo ofrece una base para la implementación de interfaces gráficas de usuario nativas en Windows, utilizando las funciones de la API del sistema vía el paquete pywin32. Puede implementarse prescindiendo de paquetes adicionales, vía ctypes, aunque resulta un tanto más incomodo para el manejo de errores, conversión de datos de Python a su equivalente en C, compatibilidad ANSI/Unicode, entre otros.
#!/usr/bin/env python
# -*- coding: utf-8 -*-

import pywintypes

from win32gui import *
from win32con import *


class MainWindow():

    def __init__(self):
        message_handler = {
            WM_CLOSE: self.OnClose,
            WM_DESTROY: self.OnDestroy,
            WM_COMMAND: self.OnButtonPressed
        }

        self.hInstance = GetModuleHandle(None)

        wndclass = WNDCLASS()
        wndclass.cbWndExtra = 0
        wndclass.hInstance = self.hInstance
        wndclass.hIcon = LoadIcon(None, IDI_APPLICATION)
        wndclass.hCursor = LoadCursor(None, IDC_ARROW)
        wndclass.hbrBackground = COLOR_BTNFACE + 1
        wndclass.lpszMenuName = ""
        wndclass.lpszClassName = "MainWindow"
        wndclass.lpfnWndProc = message_handler

        RegisterClass(wndclass)

        self.hwnd = CreateWindow(
            "MainWindow", "Ejemplo", WS_OVERLAPPEDWINDOW, CW_USEDEFAULT,
            CW_USEDEFAULT, 400, 200, None, None, self.hInstance, None)

        self.lblName = self._CreateChildControl(
            "STATIC", "Nombre:", SS_SIMPLE, 10, 10, 60, 20)

        self.txtName = self._CreateChildControl(
            "EDIT", "", ES_LEFT, 75, 10, 200, 20)

        self.btnHello = self._CreateChildControl(
            "BUTTON", "Saludar", BS_TEXT, 280, 10, 100, 20)

        self.lblOutput = self._CreateChildControl(
            "STATIC", "", SS_SIMPLE, 10, 50, 300, 20)

    def _CreateChildControl(self, control, title, style, x, y, width,
                            height):
        hwnd = CreateWindow(
            control, title, WS_CHILD | style, x, y, width, height,
            self.hwnd, None, self.hInstance, None)
        ShowWindow(hwnd, SW_SHOW)
        return hwnd

    def OnButtonPressed(self, hwnd, uMsg, wParam, button):
        if button == self.btnHello:
            SetWindowText(self.lblOutput,
                "Hola, {}!".format(GetWindowText(self.txtName)))

    def OnClose(self, hwnd, *args):
        DestroyWindow(hwnd)

    def OnDestroy(self, *args):
        PostQuitMessage(0)

    def Run(self):
        ShowWindow(self.hwnd, SW_SHOW)
        UpdateWindow(self.hwnd)
        PumpMessages()
        UnregisterClass("MainWindow", self.hInstance)


if __name__ == "__main__":
    window = MainWindow()
    window.Run()
La lista completa de controles disponibles para utilizar en CreateWindow o _CreateChildControl está disponible en este enlace (sección Remarks). La documentación del paquete pywin32, en este otro.
Curso online 👨💻
¡Ya lanzamos el curso oficial de Recursos Python en Udemy!
Un curso moderno para aprender Python desde cero con programación orientada a objetos, SQL y tkinter en 2024.
Consultoría 💡
Ofrecemos servicios profesionales de desarrollo y capacitación en Python a personas y empresas. Consultanos por tu proyecto.

